Showing posts with label Veggie Delight. Show all posts

Thursday, 15 January 2015

Medu Vada


I have started my daily Gym routine from today. Its been almost a month since I have worked out. Its time to get back in shape & also get fit. I used to feel so energized & active when I used to exercise daily. I don't do too much, but just the treadmill & cycling. My legs are hurting very badly  today, coz every time I start after a break its like this for a week. I need to somehow keep myself motivated & workout regularly.  

Today is Pongal & I thought I will make some Tamil special for Dinner. I have made Ven Pongal, Sweet Kesari, Vada, Sambar & chutney for dinner Well, why  not sweet Pongal? coz one of my good friends is dropping by this evening to give me sweet Pongal:). I am so blessed to have wonderful friends in my life.  Today I am sharing Medu Vada recipe. This is called Uddina Vada in Karnataka & many other names in different parts of south India. Its a very simply recipe but you need to get the technique right. These are also called as Indian savory Doughnuts. You need to make sure that you grind the Urad dal thick & add very less water. This is how its made


Makes: 8 to 10 Vadas
Making time: 30 mins
soaking time: 4 - 6 hours
 
Ingredients:
  • 1 cup Urad Dal(Soak in water for 4 to 5 hours) and grind to a semi smooth paste (don't add water. add very little if required)
  • 1 tspn finely chopped Ginger
  • 1/4 cup finely chopped onion
  • 1 finely chopped green chili
  • 4 to 6 chopped curry leaves chopped
  • 2 tbspn finely chopped coconut pieces (I used frozen)
  • 1 tbspn whole Black pepper
  • Salt as per taste
  • Oil for deep frying
 Method:
 
  1. Grind the soaked Urad Dal in a Mixer into a smooth paste. Make sure you do it in small quantity. Add very little water if required. If you feel the batter is watery, just put it in the refrigerator for 1 to 2 hours. This will help the batter to thicken.
  2. Now mix rest of the ingredients mentioned above into the batter.
  3. Heat Oil in a pan, take small size batter with greased hands (or wet hands) make a shape of doughnut & immediately drop it in hot oil. Fry for 2 to 4 minutes until golden brown on medium heat. You can also make round Vadas. Just use a tablespoon, pick the batter and drop it in the oil. Now the Vadas are ready.
 
Note:
  1. If you are making these for the first time, you will find it hard to get the shape right. Practice will make it perfect. The shape depends on the batter consistency too.
  2. Be careful when you drop in the Vadas in the oil, sometimes the oil will splutter & you will end up burning your hands. I have had many accidents in the past :)
  3. This goes very well with Sambar & Chutney. I will post my Sambar recipe some other time.

Tuesday, 13 January 2015

Stuffed Gobhi Mussallam


(Please note that the Olive oil in the picture was added to make the picture look more presentable. In real, you will not have so much oil. I have also presented only a small portion of the dish in the picture with just 3 florets)

 I have now decided that I will at least post 2 or more recipes in a week in my blog. This morning I have been thinking of making something new & different. I had heard about this dish "Gobhi Mussallam" for the first time a month ago, when my friend mentioned about it. She said it was made during Diwali & other occasions at her home. That is when I started my research for this recipe. Finally I found one which I felt could be good. Well traditionally the whole Cauliflower is baked/tandoored & added into the masala. I decided to cut mine into big florets & add them. Somehow I am not very comfortable to have a big vegetable:) Upon checking the Mussalam recipe, I felt it was very similar to the regular masala recipe. That is why I tweaked in the recipe to make it more tastier. This turned out super delicious & a must must try recipe. My hubby kept licking his fingers... This is how I made it.


Serves: 3 - 4 people
Making time: 1 hour
Preparation time: 10 mins

Ingredients
  • 1 Medium Cauliflower cut into big flowers
  • 3/4th cup Chenna (Soft cottage cheese)
  • 2 tbspn of olive oil for baking cauliflower
  • 1 Tspn Chili Powder
  • 1 cup organic Tomato puree
  • 1 Tspn Coriander powder
  • 1/4 Tspn Turmeric power
  • 1 Tspn Cumin powder
  • 1/4 Tspn Cumin seeds
  • 1 Tspn Ginger Garlic paste
  • 1 medium Onion (Around 2 cups roughly chopped)
  • 2 Tsp Kasoori Methi
  • 3 Tbspn Greek Yogurt
  • 1/2 tspn cardamom powder
  • 4 Tbsp olive Oil
  • Curdled milk (Chenna) from 1 Ltr whole Milk
  • Salt as per taste
Direction:
  1. Make a marinade with cottage cheese, cardamom powder, kasoori methi & salt. Stuff the washed Cauliflower florets with this marinade. Make sure it is well coated.
  2. Pre heat the oven to 380 degrees & bake the stuffed cauliflower for about 15- 20 mins. Make sure you sprinkle some olive oil on top of the cauliflower. Once they are cooked set it aside.
For the Mussalam gravy
  1. Grind onions along with ginger & garlic to a fine paste.
  2. In a heavy bottom deep pan add oil. Once its hot add cumin seeds & ground onion paste. Cook this for about 6 to 8 minutes until it starts to stick & fat separates . Make sure you keep sautéing in between.
  3. Now add in the tomato puree, cumin, coriander, turmeric, chili powder, salt & cook it on medium flame for about 5 to 7 minutes. Keep stirring in between.
  4. Now add in 2 cups of water, cover the lid & cook this on medium flame for about 10 - 15 mins or until fat separation & all the raw smell goes off. Make sure you sauté in between.
  5. Now add in 3 tbspn of greek yogurt & mix well. Now the Mussalam gravy is ready.
  6. Add in the baked cauliflower in the gravy. Either mix it with gravy or just place it on top of the gravy.
  7. If you feel the gravy is very thick add in some more water. I made mine thick, as I was having them with Rotis.


How to make Chenna:
  • 1 Ltr whole Milk
  • 1 juice of a lemon
  • 1/4 cup of water
Direction: Bring the milk to rolling boil. Into the 1/4 cup of water squeeze in the lemon juice & add this to the milk. Let the milk keep boiling for another minute on low flame. This process will curdle the milk better. Now turn off the flame & drain off the water on a muslin/ cheese cloth. keep this under running water for few seconds so that the tanginess from lemon goes off. Once the water is drained off , which takes about 10 mins, the Chenna will be ready to use. Since its fresh it tastes really creamy & tasty. You can also make this ahead of time & store it in the refrigerator


Here is the step by step picture to show how to bake the Cauliflower & make the gravy


Wednesday, 17 September 2014

Egg Masala


I have become very lazy to blog after moving to Austin. I am always busy with something or the other & been addicted to TV off late:) Well I have also been taking cake decoration class here & I realized that I love teaching so much. My classes went on very well & my students were great. I finally thought, I should seriously make some time for blogging & here I am the "lazy me" Some of you must have already checked my egg masala video recipe. Today I will be posting the same recipe here. You can also visit the video here.

Serves: 4
Making time: 30-40 mins
Video Recipe : here

Ingredients:
  • 5 Boiled eggs
  • 2 cups thinly chopped onions (Cut them long)
  • 2 medium red tomatoes finely chopped
  • 1 Tbsp. minced garlic
  • 1 tbsp. minced Ginger
  • 1 tsp. mustard seeds
  • 6 to 8 curry leaves
  • 1 tbsp. coriander powder
  • 1 tsp. cumin powder
  • 1 tsp. chili powder
  • 1/4 tsp. turmeric powder
  • 1/4 tsp. Black pepper powder
  • 1/2 tsp. Garam Masala Powder (Everest)
  • Salt as per taste
  • 4 Tbsp. of Oil
 
Directions:
  1. Boil around 5 to 6 eggs. For perfect boiled eggs, make sure you are using cold water. The eggs should be fully covered under water & boil them for 12- 15 mins. Add a tbsp. of salt to the water. Once they are boiled, put them in the cold water & wait for another 5 to  10 mins until they are cooled. Once they are cooled completed, remove the skin slowly. This way you will get perfect boiled eggs.
  2. Add about 2 Tbsp. of oil in a Pan, once heated,  crackle the mustard seeds
  3. Add in ginger garlic & onions into them. Now allow the onions to turn pink. This will take about 3 to 5 mins. Make sure you keep sautéing in between.
  4. Once the onions turn pink, add in tomatoes & cook this again for another 3 to 5 mins, until the tomatoes are all mashed up.
  5. Add in all the dry Masala powder into this mixture & saute well.
  6. Season this with salt as per taste & also add in curry leaves.
  7. Cut the eggs into half. Now in a separate flat pan, add about 2 tbsp. of oil and shallow fry the eggs for about 2 to 3 minutes on both sides.
  8. Now slowly coat the Masala on to the fried eggs & the dish is ready to serve.
Note:
  • Please watch the video recipe to know how exactly the eggs are fried & added.  Click here for the video
  • If you want to make a curry, just add a cup of hot water to the masala & 1/2 cup of coconut milk.


Friday, 21 February 2014

Aloo Gobhi Tikki Masala


Aloo Gobhi (Cauliflower & Potatoes stir fry) is a very common Indian Vegetarian dish. Most of you must be making this dish at least once a week. Some times we become so bored with the same old recipe. Although I like the regular Aloo Gobhi, I decided to give it a twist by changing the process of making this dish. I must say that this new dish was absolutely yummy & very different. I will call this dish "Aloo Gobi Tikki", as the recipe is almost the same but method of making is different. This dish can be made for daily meals or even on a special occasion. Since most of my friends keep asking for new vegetarian dishes, I thought will experiment something new. This is how I made this...


Serves: 4
Making time: 30- 45 mins
Cooking time: 20 mins


Ingredients:
  • 1 medium size Onion chopped
  • 2 riped large tomatoes pureed
  • 1 tbsp ginger garlic paste
  • 1 Large potatoes (1.5 Cup of chopped potatoes)
  • 1.5 cups chopped cauliflower (Almost 1/2 of medium size cauliflower)
  • 2 Tbspn chopped Cashew nuts
  • 1 Tspn Cumin seeds
  • 1.5 tbspn Kashmiri chili powder
  • 1/4 Tspn Turmeric powder
  • 1/2 Tspn Garam Masala
  • 3 Tbsp Plain flour
  • 2 Tbsp of Cheddar cheese (Optional)
  • 4 Tbsp Oil
  • salt as per taste
  • 5 Tbsp Coriander leaves for garnish
Directions:

  1. In a microwave safe bowl add in chopped cauliflower, potatoes with 2 cups of water & cook it for about 10-12 minutes. (Either set baked potato option or boil vegetables option in your microwave) If you don't have a microwave just boil it on the stove top until its cooked.
  2. Once the Aloo Gobhi are cooked, drain water (stock) & set aside the Aloo Gobhi to drain completely. Save the drained water (stock) for the gravy.
  3. Make a paste of plain flour with few tbsp of stock & set aside.
  4. In a bowl slightly mash the Aloo Gobhi with a fork. Let the Aloo Gobhi  be a little coarse.
  5. Add in to the mash Aloo Gobhi   1/2 Tbsp of chili powder, pinch of turmeric powder, 1/2 tspn garam Masala powder, salt , 3 Tbsp coriander leaves, cashew nuts, Plain flour paste, cheese & mix well.
  6. In a Paniyaram Kadai add few drops of oil into each section. With a spoon pour this Aloo Gobhi mixture into each section & cook this on low flame for about 3 minutes on each sides. Keep rotating to make sure its cooked evenly. (You will need help of 2 spoons to rotate the mixture) Once this is cooked remove & set aside.
  7. For the Gravy: In a Pan add 2 tbsp of oil, fry cumin seeds,  ginger garlic paste for a minute, add in onions & fry them until they are translucent.
  8. Now add in the tomato puree, Kashmiri chili powder 1 Tbsp, 1/3 Tspn Turmeric powder, 1/2 Tspn Garam Masala Powder & salt as per taste.  Close lid & cook until fat separation on low flame. This process should take about 8 to 10 minutes.
  9. Once the gravy is done add in some stock as required. I added 1/2 cup & bring this to a boil. Now add the fried Aloo Gobhi Tikki & give it a gentle mix. Do not over mix as the Tikki's might break off. Finally garnish the dish with coriander leaves.

Note:
  1. If you dont have a Paniyaram Pan you can make the tikkis on a Tava.
  2. You need not add cheese, I simply added as I had a good stock of grated cheese. 
  3. This dish goes well with both rice & Rotis.
  4. I have taken step by step picture for the Tikkis.
Check out more Cauliflower recipes:
Gobhi Manchurian gravy
cauliflower-cherry-tomato-stir-fry
gobhi-badal
Gobhi Manchurian


Thursday, 30 January 2014

Mushroom Chili


It is snowing in Austin which is very unusual. It seems it snowed almost after 5 years. Its is very very cold outside & we have stayed indoors for the last 3 days. We have now moved into our new apartment & I am busy unpacking things.

I had enrolled Zion to a play school last week & he goes there 3 days a week. Day 1 he was excited to go to the school & in the evening when I went to pick him up he was OK, but I knew he was not very happy. The next day he kept saying "No school Mama".. "no school.. But still I had to send him:( Day 2 & 3 he was crying in the school & somehow he doesn't like to go to school. This week I dint send him due to bad weather & the lill boy is all happy at home troubling me:)

Coming back to today's recipe, Mushrooms are very versatile & just a pinch of salt/pepper is enough for it to taste great. Mushrooms are very easy to cook & they get done fast too. I make Mushroom Chili quite often as it can be done very quick. This is a simple recipe just the way I make chili chicken. There are recipes where Mushrooms are deep fried & then put in the chili sauce, but in my recipe I haven't deep fried them. You can call this a healthy chili Mushroom. This is how I made these.


Serves: 4
Making time: 20 mins

Ingredients:
  • 2 pack White Button Mushrooms
  • 1 medium Onions layered & cut
  • 3 Tbspn chopped Garlic
  • 4 Tbspn Soya Sauce
  • 2 Tbspn water
  • 1 tspn or more Red chili powder (Kashmiri/Paprika)
  • half Green Bell pepper (Capsicum) Cut into cubes
  • 4 Tbspn Cooking oil
  • Salt as per taste
Directions:
  1. Wash/ clean the Mushrooms & Cut them into quarter (1 mushrooms into 4 pieces)
  2. In a Non stick Pan or wok add 4 Tbspn oil & shallow fry the mushrooms along with some salt until all the water is drained off & the mushrooms are golden brown.
  3. Remove mushrooms from the pan & set aside.
  4. In the same pan you will have the left over oil. Just incase the oil is drained off, add in another 2 tbspn of oil & fry the garlic for 30 seconds.
  5. Add the layered onions & fry them until translucent just for about 2 minutes. Now turn off the heat & add in soya sauce, chili powder & 2 Tbspn water.
  6. Add in the shallow fried Mushrooms in the pan along with the Green bell pepper & give it a good mix. Now turn on the heat, Close lid & cook this for just a minute or 2 on medium flame. The chili mushrooms are ready to serve.

Note:
  • If the Muhsrooms are really small you need not cut them into quarter. Since mine was medium size, I cut them.
  • A good soya sauce will be salty & tangy so you need not add in lemon juice. In case you don't have a good quality soya sauce then you might want to add in some lemon juice for a lill tanginess.
  • Turning off heat after adding soya sauce is very important or else the sauce will drain off.
  • Capsicum/bell peppers are added in the end so that they are crunchy. Make sure you don't over cook them.
  • The step by step picture was taken when I made from one packet of Mushroom. The recipe above is for 2 packs of Mushrooms. In case you are making for 2 or 3 people, Then 1 packet is more than enough & just add half the quantity of ingredients mentioned above.
The last step where water, Mushrooms & Capsicum is added is missed out in the step by step picture:(

Sunday, 27 October 2013

Soya Stuffed Baked Tomatoes


I met Rafeeda 4 months ago in this wide blogging ocean. Although we have had minimal on line conversations, she comes across as a very simple sweet person. I always admire her time management skills & she plays a very good role in balancing work +family+passion. I really don't know how she does it! She is a very active blogger & never misses an opportunity to drop an honest feedback on my posts. When she pinged me to ask if I could guest post in her blog, I was very happy & told her yes right away. This is my first ever guest post & I am very glad that I am doing it in one of my favorite blogs. 

Please visit her virtual space for some amazing Malabar Cuisine. She has a big sweet tooth like me & she has named her blog " The Big Sweet Tooth"

Check out the recipe for Soya Stuffed Tomatoes here


Thursday, 10 October 2013

Moussaka

 
I have a liking for Mediterranean food as they use a lot of similar Indian spices in their cooking. Their cuisine is world famous & I am sure you must have tried at least one Mediterranean dish in your life. I am planning to cook many of their recipes. I made Mousakka last week & it was a vegetarian version. I never thought that this dish would taste so good. I was not a big Brinjal fan & I eat them only when I make Bagara Baingan or Bartha, that is why I kept delaying making this dish. Finally I made it, as I had some friends visiting me & I wanted to make something different. The Brinjal is the life in this dish & it taste ultimate.
 
I am unlike most people who try to play safe when they plan a menu for guest. Most of the times I make a new dish when I have guest & 99% of the time it has worked great for me. My hubby had come home early on that day & as usual he was very hungry. I told him That I will serve Musakka & he had a big “?” on his face. When he tasted he was hmmmmmm….. kya hain ye? Amazing amazing…. That was enough for me to keep my head high & feel very confident about this dish. Well my hubby is a big critic of my food & if he says amazing then its really good. He doesn’t say amazing very often though & I wait to hear that from him every time. My guest also loved it & my friends hubby who is a big foodie took the recipe too. This dish is definitely on my appetiser list & will serve it more often to my new guests. So if you are my guest you know what to expect:) If you are bored making the very old Gobhi Manchurian , Mushrooms manchurian, kebabs for appetiser, try making this & leave your guests mesmerised.
 
 
Making time: 45 mins
Serves: 5 people
Baking safe dish
 
Ingredients:
  • I big purple brinjal
  • 3- 4 medium size potatoes
  • 1 cup minced or grated Paneer
  • 1.5 cup chopped White Button Mushrooms
  • 1 Tbspn minced garlic
  • 1 Tspn Kashmiri chili powder
  • 1/2 tspn Coriander powder
  • 1/4 tspn turmeric powder
  • 2 Tbspn tomato Paste
  • 1 large onion chopped
  • 2 Tbspn Lemon juice
  • 1/4 tspn nutmeg powder
  • 4 Tbspn grated Parmesan Cheese
  • 2 Tbspn Olive oil
  • salt as per taste
Bechamel Sauce (White Sauce)
  • 1 Tbspn plain flour
  • 3 tbspn butter
  • 1.5 cup warm milk
  • 1/2 cup cream
  • salt as per taste
  • Pinch of nutmeg powder
Direction:
  1. Cut the Brinjal & potato into 1 inch thick circle shape. Soak the Brinjal in salt water for about 10 mins, drain water & set the Brinjal on Paper towel to dry out.
  2. Pan fry the Brinjal on both sides until they are browned & set this aside in a plate. In the same pan, pan fry the potatoes on both sides until they are golden brown or cooked.
  3. In a large Pan add oil, fry garlic for a minute. Now add in onions & fry until they are translucent.
  4. To this add the tomato paste all the masalas, salt & fry them until fat separation for about 3 mins
  5. Add the Mushrooms into this & saute for another 2 to 3 minutes.
  6. Tip in the grated Paneer into the mushroom mixture & saute well until everything is well combined. Season it with lemon juice & turn off the flame.
Bechamel Sauce
  1. Place the butter in a heavy saucepan over medium heat and melt it completely, but do not let it brown.
  2. Dump in the flour and stir it quickly into the butter. The butter and flour will be a mixture of wet scrambled eggs or might look lumpy.
  3. Pour in just a few tablespoons of the hot milk, just enough to moisten the flour and butter mixture. Stir thoroughly to loosen up the thick flour mixture.
  4. Now grab the whisk and gradually add the rest of the milk & cream to the loosened flour mixture, whisking constantly.
  5. Now you will be left with a thick, warm, creamy mix of flour, butter, and milk. From here you can add salt and Nutmeg powder or even cheese.
  6. (Note: There is quite a lot of room for adjustment in the quantity of milk. For a very thick, sticky béchamel use about 1 cup milk & 1/2 cup of cream. For a much looser, more liquid sauce, use more milk, to get the consistency you want)
Assembling
  1. Layer the fried Brinjal on the bottom of the pan  & on top of them layer the potatoes.
  2. Now add in the Mushroom Paneer mixture on top of the potatoes.
  3. Pour in the Bechamel Sauce (white sauce) evenly on top of the mushroom mixture & sprinkle the top with grated cheese.
  4. Bake this in a preheated oven at 220 degree for about 20- 25 mins.

Note:
  • You can use any filling you want.Since my guests were vegetarians I used Mushroom & Paneer
  • You can also add in cheese to your Bechamel sauce
  • If you don't have an oven you can microwave this for about 2 mins until the bechamel sauce is set.
  • You can make this dish ahead of time & freeze it. You can defrost & bake it just before serving.


Friday, 12 July 2013

Goli Baje/ Mangalore Bajji


Mangalooru Bajji or Goli Baje is another fried snack that is very famous in the Mangalore region. These are also available in most of the udupi restaurants in Bangalore.  This was also one of the snacks my mom used to make for us. The best Goli baje's I have had is in coorg. There used to be a small canteen by name Kumar Vilas & my Pappa used to parcel some from there & get it. These were so delicious that my sister & I used to fight for major share. Back in Mangalore during our college days along with Buns, we used to order this one too. Hot baje's were served with coconut chutney & these were like KFC burgers to us.  These are easy simple to make & a very good evening snack with some filter coffee. This is how I made them:


Ingredients:
  • 1 Cup All Purpose Flour/Maida
  • 1/4 cup Chickpea Flour
  • 1/2 cup yogurt
  • 1.5 Tbspn Coconut (chopped)
  • 1 Tspn Cumin/Jeera Seeds
  • 1 Tbsp Ginger (finely chopped)
  • 1 Tbspn Green Chili (finely chopped)
  • 6 to 8 curry leaves chopped
  • Sugar - 1 tsp
  • Baking Soda - 1/4 tsp
  • Oil for frying

Directions:
  1. Make a batter with all the above ingredients. The batter consistency should be as thick as cake batter.
  2. Let the batter rest for at least 20 minutes
  3. Now take 1 Tbspn of batter & drop them in the medium hot oil. Fry these for 2 to 3 minutes until they are golden brown. These Baje's will increase in size while frying. Goli Baje has a crisp crust outside and a soft spongy interior. 
Note:
  • You can wet your hands & drop a small portion of batter in the oil to get those perfect round shapes.
  • Zion was in my hand while I was making these, so could use my hands.
 

Wednesday, 10 July 2013

Paneer Butter Masala


I haven't slept well in the last 1 month properly. I am looking for a soundless 8 hour sleep & I don't know when that dream will come true. I had picked up some roast chicken from Fair price the other day & had fed Zion also some. After eating that he had a bad stomach pain & lose motion. Last night he was getting up every 3 hours with stomach pain & lose motion:(. My poor boy couldn't sleep well nor we could. Later got to know even hubby had a bad stomach. I rarely give outside food to Zion. Since he had mutton cutlets in the afternoon, I thought will give him some chicken for dinner. From now on I am not buying those roast chicken anymore. These roast chicken looks really nice & they are very cheap like 6 or $7 dollars for the whole chicken. Since I was out the whole afternoon shopping, thought will pick this up for dinner. Now I regret badly feeding my boy:(


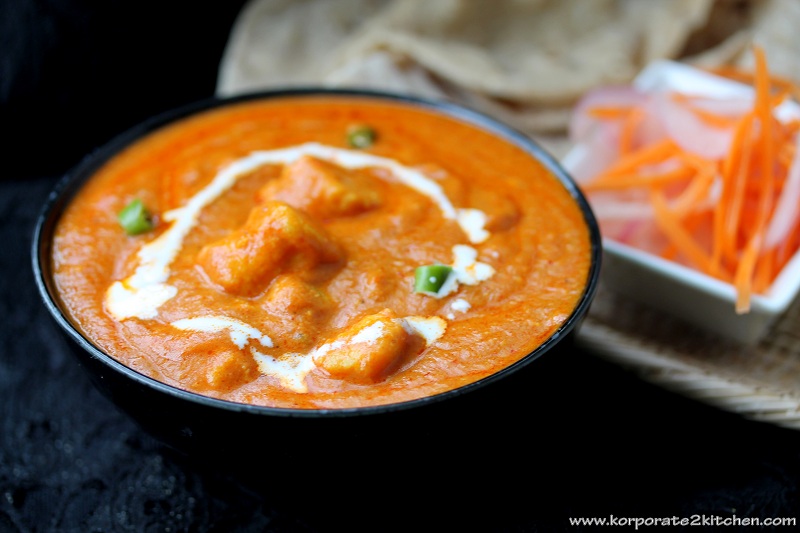
Coming back to today's post, I was surprised to see No Paneer Butter Masala recipe in my blog. This is one dish I make so often at home. You know the most common dishes that we make are the missed out ones in the blog:) I figured it out that I also haven't updated recipe for Chicken Butter Masala. My Paneer Butter Masala recipe is always a hit at home & also among my friends. I find this recipe very simple & easy. No one can go wrong with this recipe. Depending on your diet you can add more cashews or cream. I mostly skip adding the cream part in my recipe when I make it for us. Some times I also replace cashew with Almonds & that too tastes very good but different. Never fry your Paneer while making butter masala. Frying it will kill the natural Paneer flavour & it will make the paneer hard. I have used fresh home made paneer in this recipe. I find home made paneer more softer & creamier. This is how I made it.

Cooking time: 30  minutes
servings: 4 people

Ingredients:
  • 1 large onions chopped
  • 2 large tomatoes chopped
  • 1 Tbspn ginger garlic paste
  • 1.5 cup Paneer cubes
  • 1/4 cup cashew nuts
  • 1/2 Tbspn coriander powder
  • 1/2 tbspn cumin powder
  • 1/2 tbspn chili powder
  • 1/2 Tspn garam masala powder
  • 1/2 Tbspn kasoori methi
  • 1 Tspn cumin seeds
  • 1 cup hot water or more if required
  • salt as per taste
  • 1 tspn sugar
  • coriander leaves  & green chilis to garnish
  • 1/4 cup cream or milk
  • 1 Tbsp oil
  • 1 Tbsp butter
Directions:
  1. Soak cashew nuts in hot water for at least 20 mins & then make a paste of it.
  2. Boil chopped onions in 1 cup of water until they are translucent & make a paste of this.
  3. Soak the tomatoes in the hot water, peel the skin & puree the tomatoes in the blender or mixer.
  4. In a heavy bottom pan, add oil fry cumin seeds for few seconds. Now add in ginger garlic paste, onion paste & tomato puree.
  5. Cover the lid of the pan & cook this on low flame for about 5 to 6 minutes. Add a little water if required.
  6. Now add in all the masala's except kasoori methi & saute well. Throw in 1 tbspn of butter  & sugar now in to the pan. Mix this well & keep sauteing for around 3 to 6 mins
  7. When the raw smell goes off  & when you see fat separation, you can add in cashew paste & 1/2 cup of hot water. Saute this for a minute until its well combined.
  8. Finally add in the cream, Paneer, Kasoori methi & mix well. Turn of the heat after one boil. Close lid & allow it to rest for at least 10 minutes before you dig in:) Add more water if you want.
  9. Garnish the dish with coriander leaves, chopped green chilis  & some fresh cream.

Note:
  • Make sure you keep the pan closed or else you will have a messy kitchen.
  • You can add in some red colour if you want. This will make the paneer look like the restaurant style.
  • Use fresh Paneer for the best taste. If you are using frozen Paneer, then soak them in hot water for atleast 1/2 hour so that they come back to room temperature.
  • I havent added coriander leaves in this presentation but have added it just before serving this dish for dinner.


Thursday, 4 July 2013

Poori Masala


Poori is a fried flat bread & a very famous Indian breakfast. This is famous all over India be it south or north. However there are also some different version of pooris in different states like the stuffed pooris. This one is a simple one & tastes great. Since this is deep fried, I rarely make pooris for breakfast at home. This is my hubby's fav & when made he will have at least 8 to 10:). He loves to eat with mixed fruit jam after he is done with curry. I was not too sure to post this recipe or not coz this is very very simple. Since I wanted to have a good options for breakfast in my recipe index, I am posting this.
 
Ingredients
  • 2 cup wheat flour
  • 1/4 tsp salt (or as needed for taste)
  • 1/2 cup water (as needed to make a pliable dough)
Directions:
  1. In a mixing bowl mix in wheat flout & salt.
  2. Now add in water as required & make a soft dough kneading it continuously for about 2 to 3 minutes.
  3. Make small balls out of it. You can decide don the size of pooris depending on the size of your pan.
  4. Now with a rolling pin, roll the small dough thin & flat. Sprinkle some flour on top so that it doesn't stick. Now remove any access flour & drop it in the hot oil.
  5. Once you drop it in oil, make sure you keep pouring the hot oil on top of these pooris so that they puff up. Just 30 seconds is all that you need to get these cooked & puffed.
  6. Now they are ready to eat.
Note:
  • Make sure you make many flat pooris so that you can fry them faster back to back.
  • Do not let the rolled pooris sit long outside as they will get hard & crack.
  • You have to fry them in hot oil like we do for Papads
  • These are best with Potatoes Peas curry.